Showing posts with label Pattern Review. Show all posts

Wednesday, April 12, 2017

1975, Tiny Foxes, and a Stash-Busting Dress

My unofficial New Year's resolution was to use fabric and sewing supplies that I already had and not buy any more unless it is absolutely necessary and it had an end project in sight. No buying for potential projects. No buying because it's pretty. Only if it is needed for a current project. It's high time for some serious stash-busting. 

This project took care of one of the many fabrics that I've had on the shelf. :chuckles: Only one. 

A few years ago, a friend and I were wandering around the local quilt shop just visiting and hanging out. I wasn't looking for any material in particular. Just browsing. This is the sort of outing that is most dangerous for the bank account. Then I spied it: a gorgeous grey with tiny foxes and vines scattered all over it. In a heart beat, three yards became mine.
And on my fabric shelf it sat (sound familiar?). Waiting for the perfect pattern to make it become the perfect dress. Somehow some vintage patterns came into my possession (either given to me or I found it antiquing). I didn't really put two and two together until I was cleaning out my pattern collection, and then the inspiration struck.  
I was :really: hoping that this pattern would work. It certainly would fit me, but someone in its past cut the pieces to the shirt length. I didn't have it in me to draw out the missing skirt, so back to the pattern collection I went finding this 1975 Simplicity gem. Similar, but this one is a button up front. Oh well. That's no biggie. 
 Looking at the measurements, I wasn't sure how things would fit, so a mock-up was made. In all of it's funky glory. I had an old flannel sheet that had started to shred for the material. It all went together rather swimmingly. Almost too easily. Since when does that happen with a new-to-me pattern? Once 'finished,' I showed my mom saying that I had finished the project. She turned around expecting the tiny foxes and instead there was this snazzy flannel shirt. 
Lousy selfie skills
Since there weren't any alterations needing to be made to the dress (yay for loose fitting clothes!), I was able to jump right into cutting the adorable fox fabric. The only cinch? The pattern calls for almost 4 yards of fabric and I only had three. And it has a nap (directional print). Each piece was carefully laid out and pinned to ensure that the essentials would be able to fit. The only things that I had to sacrifice was the matching belt and the 3/4 sleeves that I was wanting (short sleeves are fine by me). Not bad for cutting that much yardage from a pattern. 

Everything was sewing together just fine. Until I got to the pockets. For some reason I had to pick those seams several times before my brain could wrap around the concept (and these aren't my first pockets either). I'm going to blame spring fever for this one. The garden was beckoning, but it was raining. Again. 
Not how a pocket is supposed to look
Then I finished it! Well, almost. I still needed to do the button holes and sew on the buttons, but I didn't have enough of the same kinds of buttons for this project. So Lady Catherine modeled the dress until I was able to get to the craft store. 
 Once at the craft store, I was very underwhelmed with their selection. I'm not sure if it's because I went to a different store or if they were changing out the product. Either way... I wasn't ecstatic about what I found, but they sufficed.  

Now it was finished. And it looked like a mumu. A very comfy mumu, but a mumu nonetheless.
Selfie skillz I haz not
 But it's nothing that a belt can't fix! 
I'm a dork. 
 To finish my 1970's librarian look, I added a sweater and some vintage-inspired shoes that I found at the thrift store. 
I hope to get better pictures once the weather plays a little nicer. 

I still can't get over how adorable the tiny foxes are. 
The lo-down:
  • Pattern: Vintage Simplicity 7050
  • Fabric: 3 yards of OOP - Probably $10/yard
  • Notions: 9-3/4" light grey buttons from Joann's - $6
  • Time - Could easily have been a day project if I had all the supplies on hand

Until next time!
SG

Monday, February 20, 2017

Red Poppy Dress

 This entire project was thought up and supplies gathered together back in September.  Comparing that to other projects that I have stashed away, this dress had a rather quick turn-around. :P I was wandering around Joann's with 3 hours to kill between classes. Me + being left unattended in a craft store = bad idea. Or maybe it isn't. You be the judge of that. 
Because my self-assigned deadline for this project is at the end of March, it jumped to the top of the priority list. One afternoon, I cut out the pattern and the fabric, and marked out all the pattern notes. 
It was about this time that I discovered Angela Clayton's youtube video detailing how she made her 50's inspired dress. The construction of my dress is a combo of the directions that came with the pattern and following her techniques - especially in the skirt assembly. 
So the next afternoon, I sewed the skirt pieces together and left it to drape overnight to let the bias stretch out.
I then turned my attention to constructing the bodice. The pattern doesn't call for any lining at all, but I really like the idea of a lining, so made a lining out of old sheets I did. [/Yoda voice] Commence the dart making. All 12 of them. 
Darts and seams sewn together, I put on the bias tape binding and the bodice was done. Or so I thought. More on that in a bit. 
 After letting the skirt hang for a while, I laid it all out on the floor and stepped back. That is a lot of skirt. 
 To make sure that everything was where it was supposed to be, I laid out the pattern piece again and trimmed the hem portions that had stretched out from hanging out. 
I really like how Angela Clayton did the hem on her circle skirt. In all my sewing adventures, I've despised hemming circles. Bleh. So much bunching up. Not fun. What Angela did was sew the fashion fabric to the lining right sides together for the entire circle. Trim the edges, turn right side out, and top stitch everything to keep it in place. Thought it wouldn't hurt, so I gave it a try. 
That was a lot of sewing circles. Because it's a full circle skirt, it felt like I was hemming for ages. But my hipster music station on Pandora helped to pass the time. 

Attached the skirt to the bodice, sewed on some snaps, and I thought I was done. 
Please pardon the awful lighting and tired face. It had been a long day. 
Never mind.  
I had some fitting issues. 
In changing the shoulder seams, I also had to change out the darts. 
Lesson of all of this? Try it on before putting on the finishing touches. 
Making alterations and doing fittings on yourself is harder than doing it to someone else. :P 
Then I changed out some of the snaps for hook and eyes. I trust those more than I do snaps. I don't want a wardrobe malfunction while dancing. Not okay. 

Did another fitting, and I loved it. There are some things I could change about it, but I'm not worried about them at all. 
The cool thing in all of this? I have it done more than a month before my deadline! :fist pump: And it was finished just in time to head off to a swing dance with a friend (seriously, I put the last stitch in it the afternoon before the dance). I was going to wear something else to the dance, but after I tried it on, I wasn't about to take it off. 
Paired it with a belt and my dancing shoes for my new favorite outfit. I'm officially in love with ridiculously twirly circle skirts. 

Project details:

Pattern: Simplicity 8085
Fashion Fabric: Joann's
Lining: Sheets from Goodwill
Notions: Bias tape, thread. hook and eye, snaps
Time: If I were focused, probably could call it a weekend project

Accessories: 
Belt- I've had in my closet for eons. No idea where I got it. 

I'll take my camera to the March ball, so hopefully I can have better pictures for you! Sometimes phone cameras just don't cut it in lower light settings, but the tiny ballroom setting was just too fun to pass up for a quick photo shoot. 

Until next time! 
SG

Monday, January 2, 2017

Simple Autumn Dress

As I was going through pictures on my phone, I realized that I had completely forgotten to share with you a dress that I finished back in October! :slaps wrist: 

I found the material (read: bed sheet) at the thrift store. Since there was a burn in the corner, I was able to tell what material it was (cotton!) as well as get a discount on it since it was damaged. Score! 
I didn't exactly know what sort of dress I wanted to turn it into, so onto the fabric shelf it went! And there it sat, and waited, and collected dust, probably forgotten a time or two. Until I found this pattern.
Source
 And then I just knew what I had to do. That lovely sheet sitting on the shelf finally had a purpose in life! And for taking up shelf space. 

The pattern itself was simple, straightforward, and came together in an afternoon. No zippers, no buttons, no bias or draping. Just cut the pieces, sew them together, add in elastic, hem everything, and voila! All done. Brand new dress, for next to nothing. Since the weather was getting nippy, I paired it with a sweater, but kept the sandal heels because reasons. 
Now I'm remembering why I never did an 'official' post sooner - I didn't have nice pictures of the completed project. :P Oh well, maybe someday! 

I definitely will be making more dresses from this pattern though! I love how it fits and how quickly it went together. 

Until next time! 
SG

Tuesday, June 10, 2014

Spot the Sleepy Puppy

Sorry that I haven't posted anything lately... Between getting a job and all the things going on 'round our farm, I haven't had a whole lot of time to dedicate to sewing... The sewing that I have been able to do has been in bits and pieces, making for slow progress on any project.

Anyways...

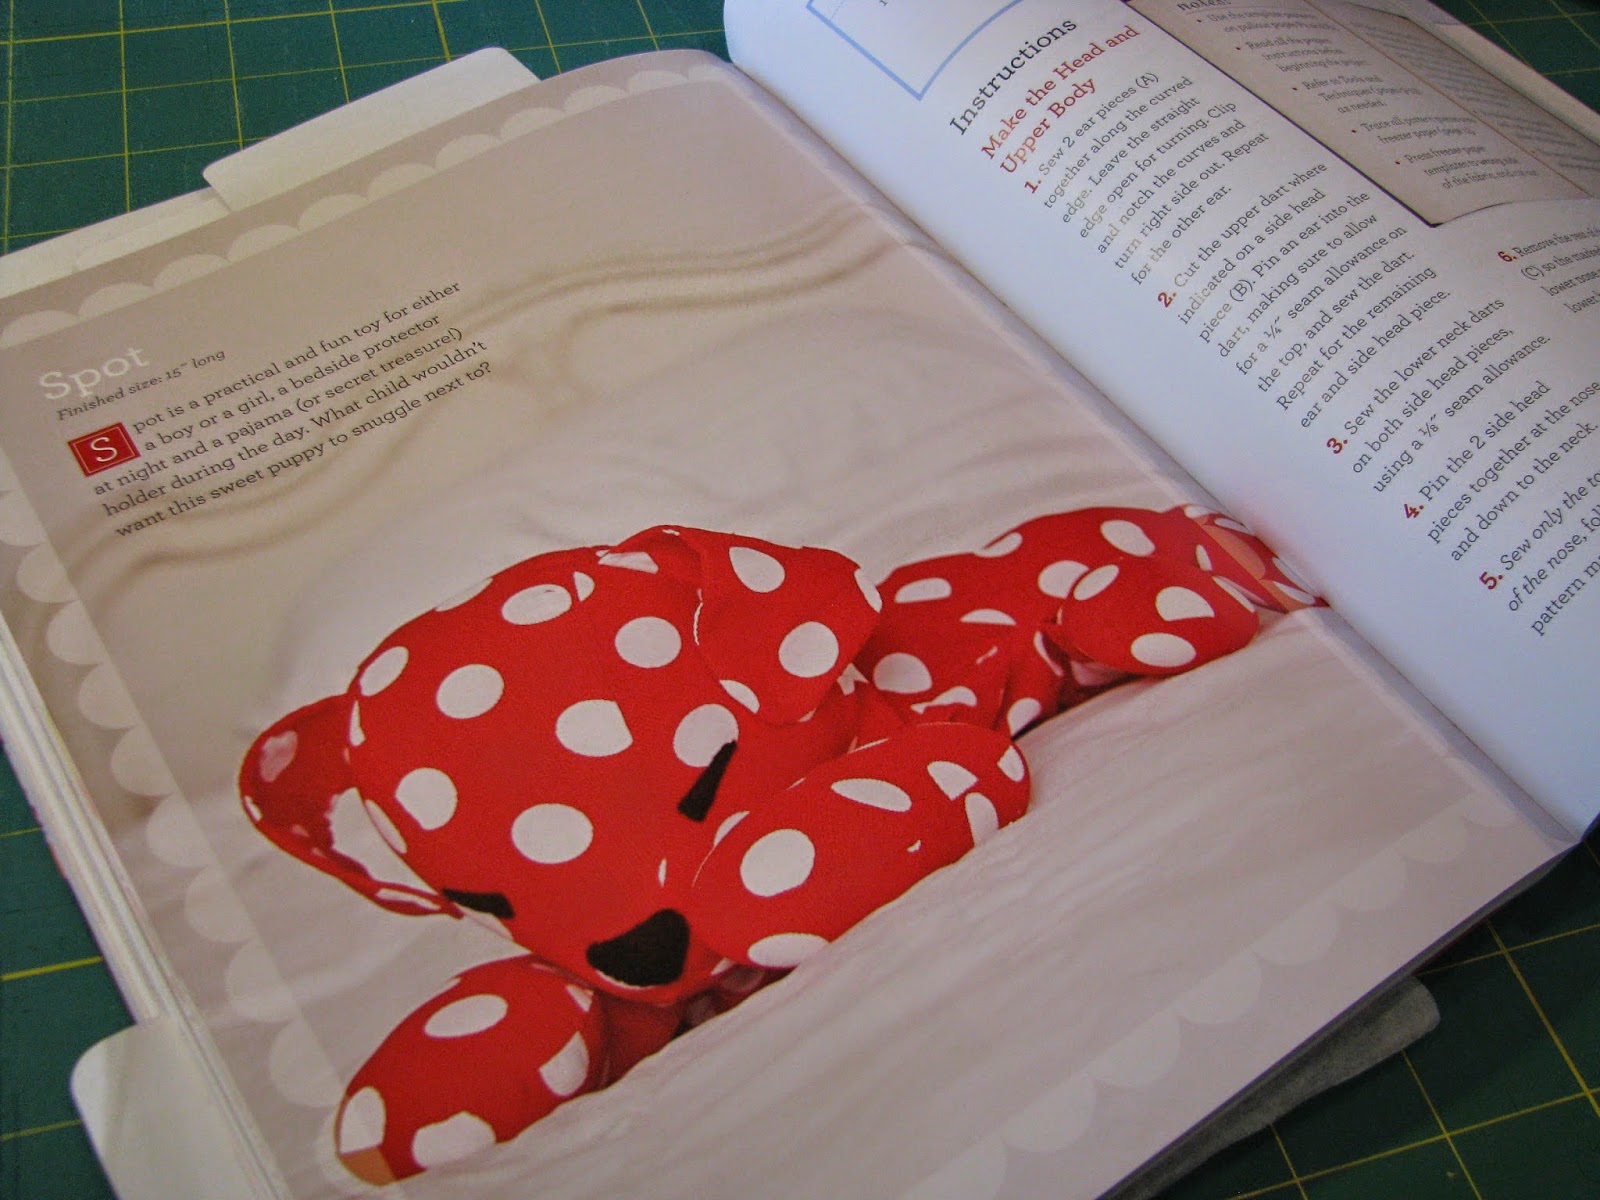
I found the most adorable sewing book at the library. And I truly mean the most adorable. Storybook Toys by Jill Hamor is certainly a book that every seamstress wants in her collection. Even if it is just for the world's cutest pictures. 
I loved the book so much that I put it on my Christmas/birthday wish-list. Lo-and-behold, it was under the tree. ;) But I haven't had an excuse to make one of the projects in it 'til now. 
A couple in our church just adopted a little boy. They've been waiting for a baby for two years, and now they have a little boy. I've been making quilts for all the babies lately, but I wanted to break my trend and try something different. Spot the puppy was the perfect thing to make for the little one. 

I even had all the supplies in my stash.  
I love having all my fabric on mini bolts. I can quickly scan everything to see if I have what I need before I made a mad dash to the craft store to get what I need. 

I transferred the patterns onto Swedish tracing paper (best gift EVER! I use that stuff all the time!) and cut out the pieces.  
As I was cutting out the fabric, I was really beginning to wonder, 'How on earth are these pieces going to make a dog?!' I trusted the directions and followed them to the letter. I wasn't disappointed; I had a sweet, lounging puppy when all was said and done. Actually, I didn't follow it to the letter exactly. (Big surprise there ;) ) The directions are for a pajama holder for your little one. I wanted a plushie, so I didn't put in the pocket inside the puppy's belly. I just stuffed him all the way and closed him up. 
I truly believe that faces are what make or break a doll or critter. Actually, I'm :really: picky about toy faces. One of my biggest pet-peeves is people who put weird or freaky faces on dolls. I guess of all pet-peeves, that's an okay one to have.  
With that all said, no pressure, right? I mean, how hard can a dog face be? Well, the face pieces weren't part of the pattern. ;) I took a deep breath and started to free-hand cut the felt into what sort of resembled what was in the book. After getting the eyes and nose cut and positioned on the face, it needed a little something extra. A spot around the eye was the perfect addition. 
G'night, Spot!

Until next time!
SG

Disclaimer: I haven't gotten anything for 'reviewing' the book. I just wanted to share it with you :) 

Sunday, March 16, 2014

King Peter's Costume: complete!

It's done! :does happy dance:
Well, at least the sewing part of things. The crown still needs more work.

I've been honored to be asked to do a custom costume for a friend of mine for an upcoming ball. 

He wants to be King Peter from The Lion, the Witch, and the Wardrobe, but he has a limited budget. Thankfully, I was able to get all the fabrics from Goodwill! The tunic used to be a top sheet, and the cape used to be a table cloth. But, shh... this is a secret between you and me. ;) You certainly wouldn't guess that the materials had a previous life. All the trims and notions came from Joann's. Guess where most of the budget went to. Yeah, Joann's. It's amazing how quickly trims and what-not add up!

My dress form isn't happy with what a men's costume does to her girlish figure. Oh well, Lady Catherine, you're just going to have to get over it. 
For the tunic, I used McCalls' Pattern 5500. As far as alterations go, the sleeve was changed, I used a collar from another pattern that was buried in my pattern collection, and I added a pleat in the back since the neckline was too wide. As for the decal on the front, I just used a generic brocade stencil from Joann's and some gold fabric paint. In retrospect, I could have used puff paint to make it resemble embroidery, but I think it looks fine as it is. The trims were all sewn on by hand since my sewing machine is picky about what can and cannot be sewn. It was a perfect project to work on in the living while visiting with my grandma from out of town was staying with us for a weekend. (That was quite the run-on sentence...) 

The cape is Simplicity 5794. Altered of course. ;) The hem was trimmed to the correct length to allow for dancing (aka - no dragging on the ground), and I drafted a piece to allow for only needing the back part of the cape to match the style of Peter's in the movie. All in all, I'm pleased with how everything turned out. 

Now it's time to turn my sights onto recreating Peter's crown. I've never made a crown before. After some looking around on the interwebs, I came up with my own blend of things to make a crown fit for a king. Alas, there's no gold-smithing involved with this process. Just lots of foam, cutting things out, painting, and glueing. I'll post a more detailed post after I get it finished.     


Once a king or queen in Narnia, always a king or queen in Narnia.

Until next time!
SG
Thursday, February 20, 2014

Throwback Thursday: Mid-1800's British Uniform

With much gnashing of teeth, pulling of hair, staring at it awkwardly in fear, wracking my brain over how historically 'accurate' it is going to be, taking my brother shopping with me at the fabric store, some more staring, and going back to the store... oh you get the point. It took me almost a year to finish this coat. My brother asked me if I could make him a very specific coat (and this is coming from the guy who rarely asks for anything) - a British officer's uniform from the Zulu War. We worked out a trade, and I sorta set to work. It certainly ranks #1 hardest project I've ever done in my sewing career. I can point out all of the oops, shortcuts, the what-was-I-thinkings, and the 'that-shouldn't-have-worked-but-it-did-anyway.'  I've never done any sort of man's garment before, let alone a lined, tailored jacket! But I survived to sew another day. ^_^

The lo-down:
Pattern: McCalls 4745 (A)

Alterations:
- The pattern is originally drafted for American Civil War, not the British Zulu War. So the color is obviously different. ;)
- lapels on the shoulder drafted from one of my brother's trench coats
- gold braid and decorative buttons added to collar
- My brother has a very strong, athletic build, so, even with cutting it to his measurements, I had bring in the waist even more and put more ease into the shoulders.

Problems:
- The gathers on the sleeves weren't long enough per the instructions, so I had to spread the gathers out even farther.
- The coat tails... a living nightmare. I couldn't figure out the directions after studying it and rereading it. The pictures with the instructions hardly corresponded with what you were doing... I eventually wound up on a pattern review site and I went through everyone's suggestions on how they survived and managed to finish the coat. Those were life savers.
So the final verdict? Would I do it again? Eh... Maybe. :shrugs: Maybe if I can work up the courage to do it again. ;)
Now my brother just needs to find the hat, boots, accessories and what-not to make the whole outfit complete. Then we can get some better pictures with him all decked out in the apparel. My part of his ensemble is finished.

Until next time!
SG

Tuesday, February 4, 2014

Rococo Panniers

If you love recreating historical fashions, you know what I'm talking about. You see gorgeous fashion plates, preserved gowns in museums, detailed paintings, immaculate reproductions, and you want to get that same look. You make a dress inspired by the originals. But the same conundrum rears its ugly head when you look in the mirror - it doesn't look the same as in the pictures! But how? Where do you wrong?  

It has taken me a while to get to the point where I've convinced myself that the unmentionables are a worthy investment when you're in the world of historical costuming. If you want 'the look,' you will need all the proper structural undergarments are a necessity. My Civil War wardrobe is off to a good start (corset, chemise, petticoats, etc). Now, I'm diving into the world of Rococo. 

What's one of the first things that you notice when you look at dresses from the mid to late 1700's? All that hip action! No, not like Elvis Presley. Skirts so wide that carriages had to be remodeled to accommodate the fashion trend (Ah, the royal French court). How did dresses reach such feats? Panniers. In a word, hip extensions. And I'm crazy enough to have made a pair of my own. 

Pattern: Simplicty 4092
Lady Catherine, the dress form, modeling panniers
The only thing that I changed was the addition of the ruffles. Otherwise, everything was straight forward and relatively simple. It was a bit of a wrestling match with the boning and turning things inside out and right side out and sewing things together, but everything you needed to know was right there in the instructions! I love it when patterns play nice. 

Oh la-la!
My next project challenge is going to be the 1700's stays (or corset). I've never attempted corsetry before, so this is going to be new territory. 

Just keep sewing!
SG