Showing posts with label Cosplay. Show all posts

Sunday, September 30, 2018

Hobbit Dress

After Comic Con, I was left with a hopeless longing to travel through Middle Earth (I blame Karl Urban, but I digress). Thankfully, there was a Hobbit ball coming up. 
I dug through the costume closet, but nothing grabbed my attention, fit well (thank you health issues), or screamed 'I would be perfect for the ball!' Drats. Guess I had an excuse to make a ~new costume~

That meant that I had two weeks max to make something. Anything! I turned to the fabric stash. 
Plenty of options resided there, but would anything work together? The cool thing about the Lord of the Rings movies is the diversity of costume eras and classes to draw inspiration from. Each race had styles and embellishments that matched their culture, and all that with fantasy flair thrown in because why not? I could totally keep geeking out over the costumes in those movies, but I'll spare you. 

With that in mind, I pulled down literally anything and everything that even closely resembled something that might be worn in Middle Earth, compared those to patterns I already had on hand, and tried to estimate if I had enough material to make the idea happen. That was quite the mess, if I do say so myself. I finally landed on an earthy palette with some 1700's flair using American Duchess's Simplicity pattern 8161 from the Outlander series as a loose base to launch my Hobbit vision because I can't leave a basic pattern as it is. I did the jacket, ditched the sleeves, and added a peplum. The skirt and stomacher I did leave 'as is.' So all in all, not a lot of changes. ;) 
If time favored me, I also planned on using the undergarments pattern from that same line to make a chemise and bum pad to finish off the look, but that was the lowest on the priority list given how much time I had to put this all together. 

And so I sewed in any moment I could find. I must say, that was probably some of my more focused sewing, and yet, extremely relaxed. I don't know what was up. :P But that is why I don't have any 'in progress' shots. I would turn up my music and just sew. For the little bit of hand sewing that was involved, I turned on Gilmore Girls. I maybe got through two episodes, and I was done with the hand sewing. All this leaves now is the finished look. :shrugs: That might not be a bad thing. 
The really cool thing with this whole thing? Most of the fabrics were given to me or found for a steal at the thrift store. SCORE! Costuming on the cheap! :fist pump: The one downside to being able to use my stash - the fact that I have a stash to pull from. :P 

Let's do a supplies inventory:
Blue floral 'vest'- given to me
Brown linen/burlap stomacher - on clearance in the remnant bin at Joann's, maybe $3 max
Rust cotton sateen - given to me
Plaid wool flannel for skirt - Thrift store, 8 yards of material for $2/yard but I only used about 6 yards
Jute String - $0.99/yard, 3 yards at Joann's
Grommets - 2 packages of colored eyelets (because I only wanted to use the brown ones and the package had about 5 different colors, so in order to get enough of the color I needed, I had to pick up 2), $6.58
Chemise and petticoat (underneath) - repurposed from other costumes
Grand total: $24.55
WOOT! 

Now, I didn't have the time to make the structural underthings to :really: make the look. But now that I have the outfit, it won't take much to make those. Right? :sheepish grin: What I really noticed was lacking was pockets. The skirt had slits for pockets, but I just didn't have time to throw them together. Maybe someday. 

Until next time! 
SG

Wednesday, September 26, 2018

Comic Con Recap

Right before I go to comic con, I always get a sense of Why am I doing this? Seriously? You're paying to go to this thing? because as I explain to people who aren't into movies, TV shows, books, comics, games, etc. it sounds :really: stupid. Yeah, you pay to get in the door, get a glimpse of famous people, pay for pictures with them, pay for art and nerd bling, stand shoulder to shoulder with a horde of people, wait in line for anything and everything... blah blah blah. But then I go, join forces with thousands of other nerds, listen to panels of topics that pique our interest, stand shoulder to shoulder with them (literally, the convention center was packed) to celebrate the things we love, soak in the geekyness all around me, and relish every moment. I probably float on that high for a week and then I crash from how much overstimulation the weekend actually is for my adrenal fatigued brain. :P 
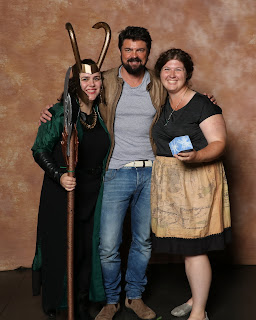
My thought this year wasn't so much to participate in the cosplay part of things. It's been a long summer, and my primary goal was comfortable. I didn't want what I was wearing to become a hassle. I just wanted to be. So for the first day, I wore my :favorite: skirt with the map of Middle Earth printed on it. Subtle. Comfy. And I got to meet Karl Urban. 💓 
Sunday was pushing my friend in her Green Lion from Voltron wheel chair (her brother did incredible work on it!) around the convention. I was really glad that it wasn't as crowded on Sunday so that there was room to actually push a wheel chair around. Saturday was so packed, I'm not sure if we would have been able to do much of anything. 
With all that pushing, I was also very glad that I planned a simple outfit for the day which brings me to the sewing part of the post.
Phew that was a long intro. :P 
I found this really cool print last year during my birthday fabric shopping spree, and from the instant I saw it, I knew it was destined to be a skirt. With Comic Con looming on the calendar horizon, I knew I needed to get it done otherwise the project just wouldn't happen. I whipped out my tape measure, elastic, and rotary blade and went to work. 
It was done in less than 30 minutes. 
Granted, it was just a basic A-line with an elastic waist band. 
And it suited the job perfectly. 
But I still want to change it up a bit. 
Instead of just an elastic waistband, I'd like to smooth out the front by gathering the skirt into a flat band and then have elastic around the back with a zipper closure. It'll make it look like I put a little more thought and effort into it and it will look more finished. I just didn't have a zipper on hand that matched the color palette of the fabric.
So that will be on my docket for whenever I feel like it. In the meantime, I have a pretty cool new skirt. 😎

Until next time!
SG

Tuesday, January 30, 2018

Preschooler Elsa

So what was my big project for January? 
Oh, just a little costume from a movie that might have been a smash hit. 
Artist Source
Actually, this dress never made it to the movie, but it was in all the concept art! 

A friend messaged me asking if I could make a preschooler Elsa dress for her daughter to wear to their family trip to Disneyland. Little miss had outgrown the Princess Anna dress that I had made, but her little sister could fit it now! It seemed appropriate to make an Elsa dress for the older sister. 

There was just two problems: I was working on an alteration commission from someone else, and my friend's deadline was just in a couple weeks. By the time I finished the alterations, I had only one week to plan, get supplies, and make the dress. Oy.
I'm pleased to say that it was finished just in the nick of time! But my days were literally go to work, get home, and get sewing. Power sewing to the max. That is it. 

I used Simplicity pattern 1507 as a base for the dress. I traced out the bodice pieces and drew on the straps and decorative bib on the front. I could have made this as two separate pieces, the jumper and a shirt, but I wanted it to be a single piece that you could easily put on without needing to hunt down all the parts of the outfit. So I took the pieces that I drafted and essentially appliqued them onto the bodice. Easy, straight forward, simple enough. The skirt was a similar story. I sewed down the ribbons along the skirt edge, and ta-da! All the sewing is done.  
Then came the details. I had several directions that I could have gone with this. I could do the rosemaling in the traditional style and embroider everything, cut out each of the individual pieces and applique them on, or pain them on. Time was not on my side, so I opted for the fabric paint. 
I've used this before for my Captain America Disney-bound dress. This particular fabric paint doesn't stand out from the material, and it's matte = no shiny. I found some close-ups to get the details and made stencils from that. They weren't perfect, but they got the general idea across. ;) I then turned on Gilmore Girls on Netflix and painted for goodness knows how long. 

But I'm really please with how it all turned out. I couldn't imagine doing all of that embroidery or appliqueing. I doubt that it would have been done in time. ;) 
Bodice Detailing
Close up of the skirt hem

I chose to do buttons instead of a zipper because they're so much cuter. 
I think it took me a week to recover from all that power sewing. :P 

Project Details
Pattern: Simplicity 1507
Materials used: Cotton Fabrics, fabric paint, buttons, thread
Time spent: Well, the sewing was done in probably 4 hours. The painting? I have no idea...

Until next time!
SG

Wednesday, September 13, 2017

Bazaar Season Begins

Well, this last weekend was a whirlwind. And preparing for it was just as crazy. Having comic con and the first bazaar of the season crammed into one weekend will surely knock some wind out of your sails.

First up - comic con on Saturday. This was my first con, and it was AMAZING! Ridiculously overwhelming, but AMAZING! I wore the Chewie skirt that I told you about, but I decided to do it without the vintage fur wrap. That morning when I was feeding the animals, it already felt too warm to be wearing fur, and I'm glad that I didn't - the convention center got really toasty. I don't know how my brother managed to wander around in his Pikachu onesie and not overheat.  
 
I loved wearing the skirt to the con. It was subtle enough that people only caught what it was if they were actually paying attention. And the people at the 501st booth geeked out over it. I was happy. 

When we got home from the con on Saturday afternoon, we had to turn around and load up the car with all the supplies that we needed to set up for the first bazaar. This particular bazaar is more advertised as an antique faire, but it's in support of the local grange (that has held many events that I've attended through the years), so I have no qualms about lending a hand (or some cash).
The booth was a collaborative effort between my sister, a friend of mine, and myself. We had an assortment of doll dresses, aprons, hats, gloves, amigurumi, and more. It was a rather cheery booth if I do say so myself. ;) 
In addition to the crafts that we brought, I added in some antiques to try to work that angle of the faire. :P I've had the Pfaff sitting in the corner collecting dust and junk, so I thought that it was time for it to go. I also included some vintage patterns and sewing notions. I was honestly surprised at how much conversation the sewing machine and patterns generated.   
One of the things that I love most about this bazaar (it's my second year doing it) is getting to meet and know neighbors. Being in the country, a neighbor is a loose term, but since we're all in the same general area, we consider ourselves neighbors. 

I'm going to try to compile a list of all the upcoming bazaars this season that I'll be at so that you can see if you can stop by and check things out! 

Until next time! 
SG
Saturday, August 12, 2017

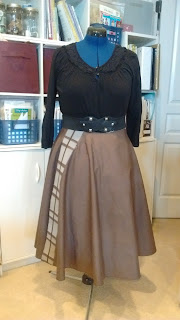
Vintage Chewbacca Cosplay - Skirt

It's been hotter than Hades out there (especially for this Oregon girl who can't handle anything over 85 degrees), so when my brain has been clear enough, I've been chipping away at the sewing to-do list. One of those things: my cosplay/Disney-bound for the upcoming comic con. 

I mentioned this project in my plans for the year back in January with just a horrible simple sketch for a brain-splat.  
The gist of it is simple: a circle skirt with an applique of Chewbacca's strap along the side, my vintage mink stole, dark shirt of some sort, and accessories to polish off the look. Last week, the skirt was (almost) finished. 
I used the wrap circle skirt pattern from this ensemble, made a white lining (so I can reverse the skirt and have a Princess Leia get-up too!), came up with an applique 'pattern' to go along the edge, sewed it all together, and voila! The skirt is done. Except for some hook-and-eyes. I still need to do that. 
As for the shirt - I'm not liking how the one I grabbed from my closet is jiving with the get-up. I'm thinking something like this one in black is what is needed. We'll see what actually happens. 

Until next time! 
SG

Monday, October 26, 2015

Tickled Pink

You might recall that last year, I made two dresses from Frozen. One was Elsa's ice queen dress and the other was Anna's toddler dress. I purposefully made them a little larger than the specified measurements and used a tie to make them fit better until the little lady grew into her dress. Because of this, both of the young ladies were able to wear their dresses a year later to see Disney on Ice's production of Frozen, and honestly, I'm thrilled that they were able to wear their special dresses for this long. :) 


Until next time!
SG

Thursday, January 8, 2015

Princess Anna in Disneyland

I just :had: to show you pictures of the little princess in Disneyland. ;) 
She ran and ran and ran, and didn't trip on the dress. 

Despite being a cotton, it wore well! (you should have seen me at the fabric store crumpling all of the cottons) There was minimal wrinkle-age. 


I could just pinch those cheeks!

And she got to see Anna and Elsa twice! 


Until next time!
SG

Friday, December 19, 2014

Toddler Princess Anna

It's ~*done*~
And of-so-painfully adorable! 
Even though she's still young, I think she understand that this is a special dress. From the moment that we put it on for a fitting, she couldn't stop smiling. Then she went on to explore the stairs and clocks because those were a just as awesome, but we'll ignore that. :P 
'Thank you, Mommy!'
I was so worried that it would be too big. All I can say is, 'Thank goodness for sashes.' ;) Little missy has some room to grow into her pretty princess dress, but it also fits her now so that she can meet Elsa and Anna at Disneyland in her first cosplay. 
I think I'm dying from cuteness overload. 

Until next time!
SG

PS - Once I get 'in action' pictures, I'll post those. Because, seriously, her meeting with Anna and Elsa is going to be absolutely charming. ^_^ 

Tuesday, December 16, 2014

Toddler Anna Dress WIP

I have another dress from Frozen to show you! 

A friend of mine has a little girl, and she's looking for an 'age appropriate' dress for little miss to wear while they're at Disney Land. Of course, Disney has really figured out how to design ADORABLE kiddos, and they're clothes are equally cute. Anna is one of the top cute kids in Disney movies. 

The inspiration for the dress is Anna's toddler dress from the song, 'Do You Want to Build a Snowman?' You can get a better view of the dress in the pictures in the book A Sister More Like Me illustrated by Brittney Lee (very sweet story and pictures!) Brittney was one of the illustrators for Frozen, and her artwork served as a launch point for the look and feel of the movie. 

I did some research for making the dress itself, but couldn't find much. If you google 'toddler princess anna,' you get a boatload of toddlers in either the coronation dress or the winter dress. :sigh: Of course I made a Pinterest board to reference while putting the dress together. ;) 
Source
I found a pattern that would be relatively easy to alter (I used the same technique for the neckline alterations here as in Elsa's dress), scalloped the skirt, cut out a dozen tulips, and went to town with applique. I must say, I've never done this much applique before. Let's call it a 'learning experience.' Double-sided fusible interfacing is your friend when it comes to applique. I don't want to know how things would have turned out if I didn't have it.
  For the scallops, I did a similar thing as with the neckline - I cut out the contrast 'underskirt' band and zigzagged the 'overskirt' onto it. I wasn't about to try to hem scallops again. 
All that needs doing now is to attach the skirt to the bodice and put in some buttons!  

Until next time!
SG