Tuesday, November 13, 2018

Preparing for a Market: A Guide

It's a scary thing doing craft fairs, shows, markets, bazaars, whatever you want to call it. You are sticking yourself out there for all to see, be critiqued, and your report card at the end of the day is how much you sold. No pressure, right? 
I've been doing shows for several years now, and I wanted to share what I've learned so far and how to prepare. Granted, I am by no means an expert in this, but there is something to be said for having experience under your belt. Hopefully in me sharing this, you can have a smoother start to things than I did. ;) 
 
What you should bring:
- all the money stuffs: a card reader, sign saying that you accept cards, change (lots of smaller bills!), receipt book
- Phone and charger
- Calculator 
- Tape
- Twine
- Scissors
- Safety Pins (they go with me everywhere, actually)
- Custom Order sheets
- Price tags
- Pens and Sharpies
- A notebook just in case
- Business cards and something to hold them 
- An inventory sheet with all the product your brought listed
- Paper bags to sent with your happy customer
- Snacks and water
- A small trash can (no, seriously, you need one)
- ALL the display pieces!
- Tablecloths 
- Table and chair depending on what the market suppplies
- A shop logo or banner so people know who you are ;) 
- Breathmints (because sitting there chewing gum isn't keeping things classy, kids)
- Deodorant (self explanatory) 
- Busy work to prevent boredom during lulls, but don't start playing on your phone. It's hard to be engaged in the moment when you're glued to a screen. Besides, people love to watch you making something! They get an immediate connection to you and what you do.
- Your beautiful creations that you're selling (duh)
- A friend to keep you company and help you out! And who doesn't need an excuse to spend the day hanging out with their bestie? 

This is just a preliminary list. As you go along, you'll figure out what works for you, what you have to have, and what you don't necessarily use. 
So beyond the 'day-of' kit and your product, how else can you prepare for a craft fair? 

Let's start with how you plan to display your pieces. If you want to be able to sell your product, customers need to be drawn into your booth and be able to see what you're selling. How you set up your display can make or break a market day. You want customers to easily see what you have to offer at a glance because as they walk by they are making the split second decision to check things out or not. I'm still working on my booth design; granted, I don't think a booth design is ever set in stone. For mine though, I have a unique challenge of blending at least 3 people's worth of product into the space and make it cohesive. It has gotten better as I've figured out better display options. My booth has been described as whimsical and eclectic. I'll take that over what felt like chaos when I first began. Something that I found helpful was to have some sort of piece that just GRABS the attention. For me, it's a vintage sewing machine that I'm trying to sell. People are drawn in, start talking, and usually end up buying something. Magic sewing machine? :shrugs: There are boat loads of display ideas online to help you get a jump start on that (make a Pinterest board to help organize your thoughts). I would recommend not figuring it all out the day before the market. ;)

Pricing your product is hard. Legit hard. People are typically not willing to pay what your product is actually worth. My general rule of thumb is (cost of materials) + (hours to make x your hourly rate). For some things that works out great! If you can whip something out with very few materials, bonus points for you! Other things don't work out so well. I try to have an array of things in my booth running the gamut of price ranges to help balance things out. 

Setting up and taking down are typically the times that I work up a sweat. :P Before the big day, I make sure I have a 'practice booth' to get an idea of what I want things to look like, snap some pictures on my phone, and pack things in an attempt at an orderly fashion so that set up is quick and effortless. Save your energy to push through a long day, not stressing with set up. And a quick note - don't start cleaning up your booth at the end of the day until the allowed time. It's rude to customers mulling about when you pack it up early. It signals to customers that they've overstayed their welcome and they won't shop anymore. You can lose sales, cause others to lose sales, and make yourself not get invited back as a vendor. Just don't do it, kids. 

A special note for the introverts. Most people I know who make things are introverted to varying degrees. They retreat to their craft and flourish making amazing things, but not really having an outlet to share what they do because of their nature. I AM ONE OF THOSE PEOPLE! When I worked retail, it wasn't the work itself that was exhausting, it was all the peopling though the ENTIRE day. Being an introvert and doing craft shows takes a lot out of you. I found this blog article to be really helpful and encouraging. There are a lot of excellent pointers and ideas to help you get through the day. ;)
Hopefully you found something helpful in that brain splat! Do you have any other ideas or pointers that you have found invaluable? Leave a comment below! 

Until next time!
SG

Sunday, September 30, 2018

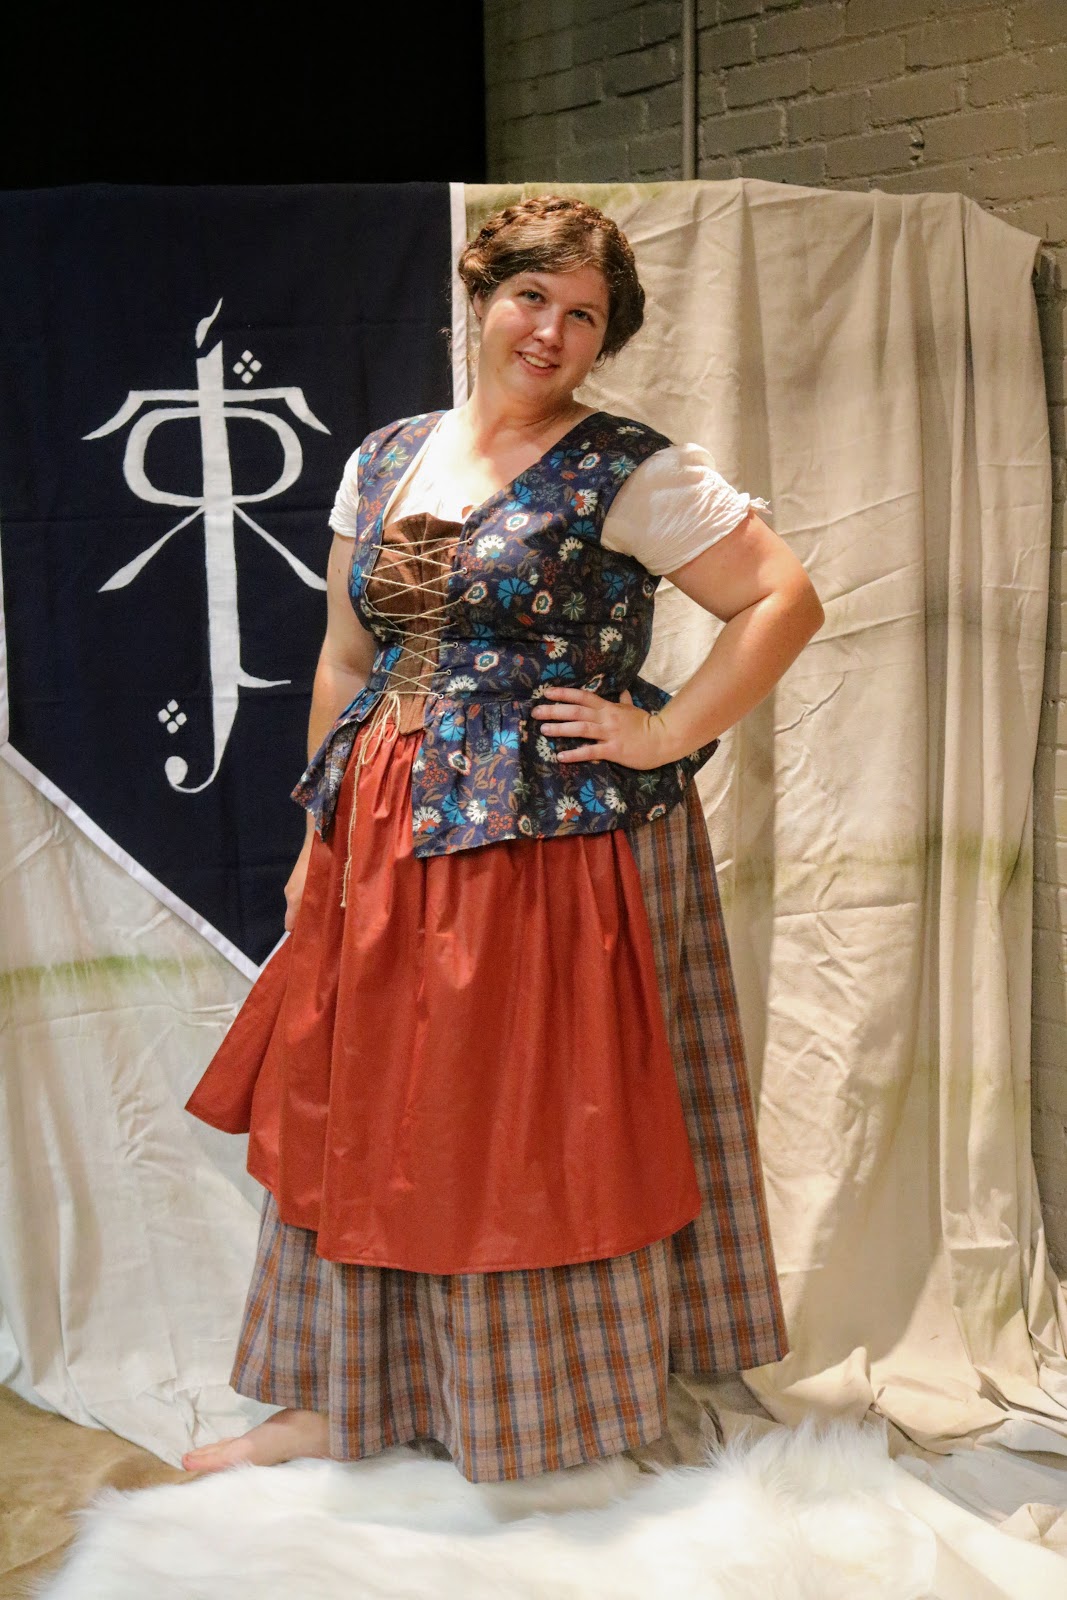
Hobbit Dress

After Comic Con, I was left with a hopeless longing to travel through Middle Earth (I blame Karl Urban, but I digress). Thankfully, there was a Hobbit ball coming up. 
I dug through the costume closet, but nothing grabbed my attention, fit well (thank you health issues), or screamed 'I would be perfect for the ball!' Drats. Guess I had an excuse to make a ~new costume~

That meant that I had two weeks max to make something. Anything! I turned to the fabric stash. 
Plenty of options resided there, but would anything work together? The cool thing about the Lord of the Rings movies is the diversity of costume eras and classes to draw inspiration from. Each race had styles and embellishments that matched their culture, and all that with fantasy flair thrown in because why not? I could totally keep geeking out over the costumes in those movies, but I'll spare you. 

With that in mind, I pulled down literally anything and everything that even closely resembled something that might be worn in Middle Earth, compared those to patterns I already had on hand, and tried to estimate if I had enough material to make the idea happen. That was quite the mess, if I do say so myself. I finally landed on an earthy palette with some 1700's flair using American Duchess's Simplicity pattern 8161 from the Outlander series as a loose base to launch my Hobbit vision because I can't leave a basic pattern as it is. I did the jacket, ditched the sleeves, and added a peplum. The skirt and stomacher I did leave 'as is.' So all in all, not a lot of changes. ;) 
If time favored me, I also planned on using the undergarments pattern from that same line to make a chemise and bum pad to finish off the look, but that was the lowest on the priority list given how much time I had to put this all together. 

And so I sewed in any moment I could find. I must say, that was probably some of my more focused sewing, and yet, extremely relaxed. I don't know what was up. :P But that is why I don't have any 'in progress' shots. I would turn up my music and just sew. For the little bit of hand sewing that was involved, I turned on Gilmore Girls. I maybe got through two episodes, and I was done with the hand sewing. All this leaves now is the finished look. :shrugs: That might not be a bad thing. 
The really cool thing with this whole thing? Most of the fabrics were given to me or found for a steal at the thrift store. SCORE! Costuming on the cheap! :fist pump: The one downside to being able to use my stash - the fact that I have a stash to pull from. :P 

Let's do a supplies inventory:
Blue floral 'vest'- given to me
Brown linen/burlap stomacher - on clearance in the remnant bin at Joann's, maybe $3 max
Rust cotton sateen - given to me
Plaid wool flannel for skirt - Thrift store, 8 yards of material for $2/yard but I only used about 6 yards
Jute String - $0.99/yard, 3 yards at Joann's
Grommets - 2 packages of colored eyelets (because I only wanted to use the brown ones and the package had about 5 different colors, so in order to get enough of the color I needed, I had to pick up 2), $6.58
Chemise and petticoat (underneath) - repurposed from other costumes
Grand total: $24.55
WOOT! 

Now, I didn't have the time to make the structural underthings to :really: make the look. But now that I have the outfit, it won't take much to make those. Right? :sheepish grin: What I really noticed was lacking was pockets. The skirt had slits for pockets, but I just didn't have time to throw them together. Maybe someday. 

Until next time! 
SG

Wednesday, September 26, 2018

Exciting Developments

Even with all of the heat this summer, I'm still alive! I didn't melt away completely although, it sure felt like it most of the time. 
I've been able to do a few small sewing projects (primarily doll dresses to stock my market booth), but the big thing was rearranging and cleaning out the craft room/family room to become a sewing studio! I've officially taken over that side of the bonus room and staked my claim. It's gorgeous. It's organized. It's easy to work in and get around. So hopefully I can crank out projects faster than before! 

In addition to that big undertaking, I've begun organizing a craft market/fair/bazaar,whatever you want to call it. I'll come up with a catchy name soon and get the details to you! 

Another bit of news - I've :finally: created a Facebook page for this blog and sewing business hobby, but I'm having a horrid time trying to figure out how to add a Facebook follow button on Blogger. Phooey. If you have anything that would help, it would be greatly appreciated!
Until I get that all sorted, you can check out the very beginning stages of a Facebook page here. 

Until next time! 
SG

Comic Con Recap

Right before I go to comic con, I always get a sense of Why am I doing this? Seriously? You're paying to go to this thing? because as I explain to people who aren't into movies, TV shows, books, comics, games, etc. it sounds :really: stupid. Yeah, you pay to get in the door, get a glimpse of famous people, pay for pictures with them, pay for art and nerd bling, stand shoulder to shoulder with a horde of people, wait in line for anything and everything... blah blah blah. But then I go, join forces with thousands of other nerds, listen to panels of topics that pique our interest, stand shoulder to shoulder with them (literally, the convention center was packed) to celebrate the things we love, soak in the geekyness all around me, and relish every moment. I probably float on that high for a week and then I crash from how much overstimulation the weekend actually is for my adrenal fatigued brain. :P 
My thought this year wasn't so much to participate in the cosplay part of things. It's been a long summer, and my primary goal was comfortable. I didn't want what I was wearing to become a hassle. I just wanted to be. So for the first day, I wore my :favorite: skirt with the map of Middle Earth printed on it. Subtle. Comfy. And I got to meet Karl Urban. 💓 
Sunday was pushing my friend in her Green Lion from Voltron wheel chair (her brother did incredible work on it!) around the convention. I was really glad that it wasn't as crowded on Sunday so that there was room to actually push a wheel chair around. Saturday was so packed, I'm not sure if we would have been able to do much of anything. 
With all that pushing, I was also very glad that I planned a simple outfit for the day which brings me to the sewing part of the post.
Phew that was a long intro. :P 
I found this really cool print last year during my birthday fabric shopping spree, and from the instant I saw it, I knew it was destined to be a skirt. With Comic Con looming on the calendar horizon, I knew I needed to get it done otherwise the project just wouldn't happen. I whipped out my tape measure, elastic, and rotary blade and went to work. 
It was done in less than 30 minutes. 
Granted, it was just a basic A-line with an elastic waist band. 
And it suited the job perfectly. 
But I still want to change it up a bit. 
Instead of just an elastic waistband, I'd like to smooth out the front by gathering the skirt into a flat band and then have elastic around the back with a zipper closure. It'll make it look like I put a little more thought and effort into it and it will look more finished. I just didn't have a zipper on hand that matched the color palette of the fabric.
So that will be on my docket for whenever I feel like it. In the meantime, I have a pretty cool new skirt. 😎

Until next time!
SG

Tuesday, July 10, 2018

The Giant, Fluffy, Millennial Pink Monster

Back when my sister was trying to figure out what the wedding party was going to be wearing, I nonchalantly said that I could do the flower girl dresses. Not the bridesmaid dresses because of many reasons, but girl's dresses are basically large doll dresses. 
Easy right? Ha! Next time I do a wedding commission, I'm picking the pattern AND the fabric.

I totally could have called this "Flower Girl Dresses" but that seemed like a boring title for this project especially considering how much TULLE went into the whole thing. :P 
I'm not kidding. 
That is 20 yards of tulle for three little flower girl dresses. I'm still trying to figure out how that much material went into their dresses. 
It tried to eat me multiple times, so I just kept hacking at it with the sewing scissors and rotary blade. 
This is FOUR layers of tulle
Eventually, the fabric was all cut out, and it was time to sew. This gave me serious anxiety. 
Again, I'm not kidding. I might have gone cross-eyed sometime in the process because it's practically invisible to work with and it liked to be eaten by the sewing machine leaving large holes in the material whenever this happened. 
These skirts stressed me out so much that I threw out my back sewing them. 
How? Sitting down for a long time has never sat well with me. (see what I did there?) And well, my sewing chair has never been the greatest. If it do any power sewing sessions, my hips and low back get really tight, but I'm able to work through that and eventually get them to relax. This time, no such luck. My back was screaming at me to the point I couldn't stand, walk, or sit in certain chairs or positions for a week. I blame the tension from sewing invisible fabric. 

But the dresses needed to get done in time for the wedding. So I wheeled up a different chair to the sewing machine and kept at it when I could. 
Have I mentioned how much I love putting in invisible zippers? They go in so easily with their special machine foot! 
The miracle in all this? All three got done in time. 
The last stitch went in on Monday night before they were delivered the next day. :phew: 
And the girls adored their dresses and looked super cute in them. Once I get official pictures, I'll get them on here so you can ooh and ahh over them. :P 
All the dresses lined up and ready to go for the big day!
So lesson in this? The last time I did sewing for a wedding, I learned to check that the fabric requirements of the pattern matched the fabric that the client wanted. This time, I've decided that I should just say, "Here's the patterns I have (because I like them) and the materials that I prefer to work with. Take your pick."

Until next time!
SG

Sunday, April 22, 2018

Radio Silence: Big Fish to Fry

Yes, it really has been almost 3 months since I last wrote here, but I have a really good excuse. It's not because I haven't been sewing, I've been chipping away at little projects when I can carve out the space and time. No, what has been eating at my time lately is the simple fact that spring is here along with the ever-increasing to-do list and...
:drum roll:
I had a big outside project that was much more work than anticipated. 
TA-DA!
I haz a greenhouse. :D
And it's only taken... a dozen trips to the store? I've lost count. 

You can read the story in more detail on my farm/homestead blog, but here's the cliff notes:
 I found the kit on Craigslist in fall.
Boxes were completely closed, all parts were there (supposedly). 
Greenhouse sits in boxes over winter.
Sister gets engaged.
I volunteered to grow the flowers for the wedding.
I needed a place to get seeds started, so they went to the greenhouse at my work.
Need space in work greenhouse, flowers get evicted.
Mad scramble to get greenhouse put up at home.
Mud. So much mud.
Bad instructions, Google translate, missing parts, lots of help, exhausted me.
Eventually was completely assembled per directions.
Flooring put in.
Tables made.
Threw out my back getting the tables put into place.
Brought flowers home.
Big wind, much rain, panels try to run away.
I say, "No" and tape them into place.
Transplanting, transplanting, transplanting some more.
Different panels try to run away on another blustery day.
I say 'no' with more tape. 
Transplant all day at work, then come home to transplant my flowers at home for days on end.
Wifi reaches garden, much Pandora listening. 

And there you have it. The cliff notes. 
I warned you that this has been quite the process. 
 But I'm super excited about what all I will be able to do with this.

Honestly, this has felt like bringing a new animal home. I am seriously considering dubbing this greenhouse 'pet.' Super creative name, I know. 
Next up will be my next commitment for my sister's wedding: flower girl dresses. So I will have a sewing project to blog about sometime in the near future. :P 

Until next time!
SG

Tuesday, January 30, 2018

Preschooler Elsa

So what was my big project for January? 
Oh, just a little costume from a movie that might have been a smash hit. 
Artist Source
Actually, this dress never made it to the movie, but it was in all the concept art! 

A friend messaged me asking if I could make a preschooler Elsa dress for her daughter to wear to their family trip to Disneyland. Little miss had outgrown the Princess Anna dress that I had made, but her little sister could fit it now! It seemed appropriate to make an Elsa dress for the older sister. 

There was just two problems: I was working on an alteration commission from someone else, and my friend's deadline was just in a couple weeks. By the time I finished the alterations, I had only one week to plan, get supplies, and make the dress. Oy.
I'm pleased to say that it was finished just in the nick of time! But my days were literally go to work, get home, and get sewing. Power sewing to the max. That is it. 

I used Simplicity pattern 1507 as a base for the dress. I traced out the bodice pieces and drew on the straps and decorative bib on the front. I could have made this as two separate pieces, the jumper and a shirt, but I wanted it to be a single piece that you could easily put on without needing to hunt down all the parts of the outfit. So I took the pieces that I drafted and essentially appliqued them onto the bodice. Easy, straight forward, simple enough. The skirt was a similar story. I sewed down the ribbons along the skirt edge, and ta-da! All the sewing is done.  
Then came the details. I had several directions that I could have gone with this. I could do the rosemaling in the traditional style and embroider everything, cut out each of the individual pieces and applique them on, or pain them on. Time was not on my side, so I opted for the fabric paint. 
I've used this before for my Captain America Disney-bound dress. This particular fabric paint doesn't stand out from the material, and it's matte = no shiny. I found some close-ups to get the details and made stencils from that. They weren't perfect, but they got the general idea across. ;) I then turned on Gilmore Girls on Netflix and painted for goodness knows how long. 

But I'm really please with how it all turned out. I couldn't imagine doing all of that embroidery or appliqueing. I doubt that it would have been done in time. ;) 
Bodice Detailing
Close up of the skirt hem

I chose to do buttons instead of a zipper because they're so much cuter. 
I think it took me a week to recover from all that power sewing. :P 

Project Details
Pattern: Simplicity 1507
Materials used: Cotton Fabrics, fabric paint, buttons, thread
Time spent: Well, the sewing was done in probably 4 hours. The painting? I have no idea...

Until next time!
SG